 American Airguns Blog
Wednesday, March 04, 2009
Scope Click Values
I have been using ballistics program for many years to estimate the trajectory of my airguns. I even wrote my own program for Windows with a very simple interface. However, none of the programs ever seemed to be very accurate at closer ranges like 10 or 11 yards. I just figured it was an estimation error in the programs calculation.
I remember many moons ago Rodney Boyce teaching me a really easy way to measure the actual click value of a scope. I don't remember the formula anymore but I figured out a pretty simple way to measure it and calculate the click value. It is pretty simple, just pick a close distance to shoot, say 15 or 20 yards, and record the distance. Measure out the distance to be accurate. Put out a target and shoot 5 or 10 shots into the target. Then click the scope up (or down) a number of clicks to get the groups apart and record the number of click of change. I used what I thought would be about 1 inch of clicks. Then shoot the same number of shots at the new setting. Then measure the distance between the groups and record it.
With these three values, the click can be calculated using the following formula:
D = distance to the target
c = number of click adjusted between groups
d = distance between the groups
click value = ((100 / D) * d) / c
Years ago I had tested my Baush & Lomb 6-24x scope and found it to be .125" per click just as specified. The Burris Signature 8-32x was specified at 8 click per MOA but they measured 6 clicks per MOA. Since measuring the click values way back then I just always used .125" per click for the Elite series scopes. Well I decided to check one of my current Elite 6-24x scopes tonight and found that it measures around .133" per click. That surprised me and make more sense that my numbers up close would be so far off. I didn't have time to plug in these values into trajectory program and then shoot test them. So, that gives me something to try in the next few days.
S
Monday, March 02, 2009
Gravity Fall Field Targets
Back in the mid '90s when I started holding field target matches at my club in Florida, I pushed the idea of spring loaded field targets. Spring loaded targets are less fussy to setup. They require less leveling and are easier to use for tree targets. This is because the spring has the target sears locked up and the spring will overcome any problems with the target not being level. They fall quickly and usuall much flatter than most gravity fall targets.
The downfalls of spring loaded field targets are that a split many time will trip the target and many have a "sweet spot" away from the kill zone that will trip the target. The reason is that since the sear is pre-locked prior to the shot, a split will not add enough addition lock up to stop it from tripping the target. Also, with the sear pre-locked, a shot away from the kill zone can bend and vibrate the target face enough to break the sear and trip the target. There are some spring target designs that work better than other but all are suseptable to these problems.
I have tested a lot of different spring target designs over the years and have concluded that I haven't seen a spring target that will overcome these problems. There may be one developed in the future but none of my prototypes or any of the current target designs I have tested have overcome these problems.
You might ask, "so what is the big deal if a split or sweet spot takes a target down?" Well, as a match director it comes down to fairness. If two guys shoot a spring target and both split the pellet. Guy A has a lower power rifle that doesn't take the target down. Guy B has a higher power rifle and powers the target down. Both split the pellet but Guy B gets a point but Guy A doesn't. That is the problem. This is the same problem with a sweet spot. If the sweet spot works for only a high power or low power rifle then one or the other has an advantage. As a match director, it is my responsibility to make sure that the course is setup, as much as possible, to make sure that it is fair to all and that no one has any unfair advantages.
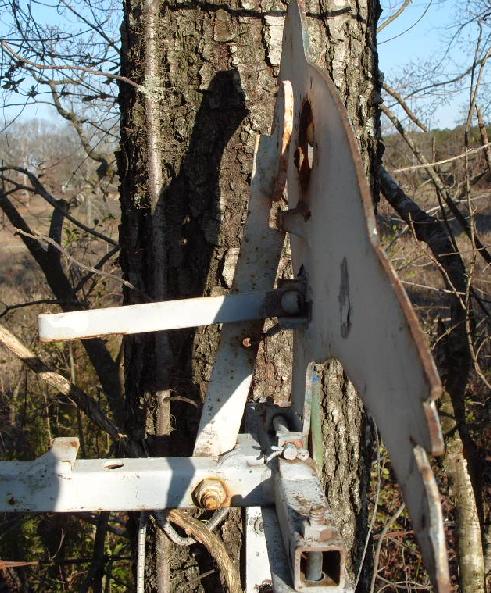 This brings me back to gravity fall targets. They aren't perfect either but they are more split and sweet spot resistant than spring loaded targets. I have been working on a variation of the old British designed Meade target. The Meade target used a pivoting arm attached to the target face to pull down the target when the paddle is hit and falls rearward. The paddle falls onto the pivot arm and the weith pulls the face downward. The top of the paddle arm forms a sear with a chunk of steel welded to the rear of the target face. When the face is hit by a pellet it rotates back into the top of the paddle arm. The kill zone paddle is attached to the rear top of the paddle arm. The system work great but it does require a bit more attention when it is set up and it still won't fall flat.
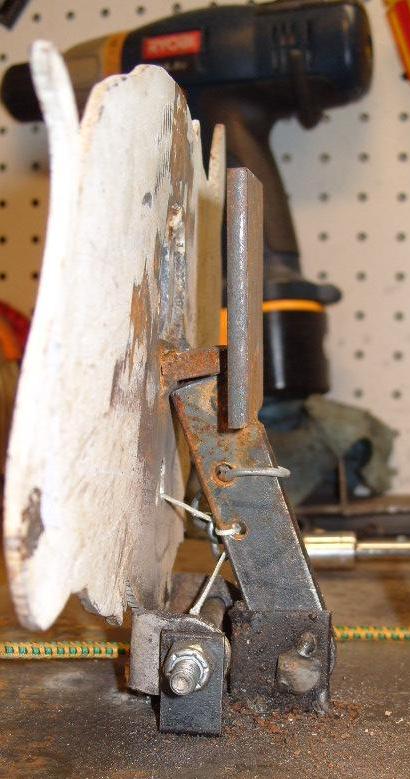
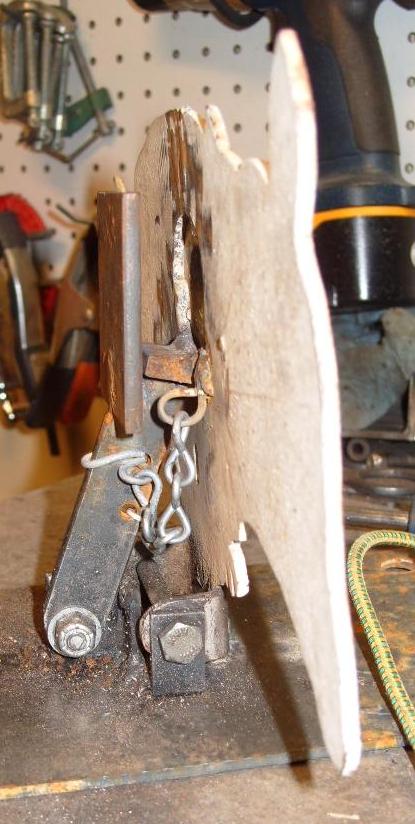 I have been working with a modified design that uses a small chain connected to the face and paddle arm to pull down the face on a hit. I have also weighted the target paddle so that when the paddle rotates back to the extent of the chain, the weight will pull the face down even with the face tilted forward 10 degrees. The face is also weighted a bit more forward so if the target is unlevel, it won't fall on its own or when it is blown by the wind. The design won't be perfect but it will make it easier to setup and work properly and help to reduce some of the target problems with spring loaded targets. I am going to retrofit some of more of my older gravity targets and some of my spring loaded targets and give the design some long term testing.
The downfalls of spring loaded field targets are that a split many time will trip the target and many have a "sweet spot" away from the kill zone that will trip the target. The reason is that since the sear is pre-locked prior to the shot, a split will not add enough addition lock up to stop it from tripping the target. Also, with the sear pre-locked, a shot away from the kill zone can bend and vibrate the target face enough to break the sear and trip the target. There are some spring target designs that work better than other but all are suseptable to these problems.
I have tested a lot of different spring target designs over the years and have concluded that I haven't seen a spring target that will overcome these problems. There may be one developed in the future but none of my prototypes or any of the current target designs I have tested have overcome these problems.
You might ask, "so what is the big deal if a split or sweet spot takes a target down?" Well, as a match director it comes down to fairness. If two guys shoot a spring target and both split the pellet. Guy A has a lower power rifle that doesn't take the target down. Guy B has a higher power rifle and powers the target down. Both split the pellet but Guy B gets a point but Guy A doesn't. That is the problem. This is the same problem with a sweet spot. If the sweet spot works for only a high power or low power rifle then one or the other has an advantage. As a match director, it is my responsibility to make sure that the course is setup, as much as possible, to make sure that it is fair to all and that no one has any unfair advantages.
This brings me back to gravity fall targets. They aren't perfect either but they are more split and sweet spot resistant than spring loaded targets. I have been working on a variation of the old British designed Meade target. The Meade target used a pivoting arm attached to the target face to pull down the target when the paddle is hit and falls rearward. The paddle falls onto the pivot arm and the weith pulls the face downward. The top of the paddle arm forms a sear with a chunk of steel welded to the rear of the target face. When the face is hit by a pellet it rotates back into the top of the paddle arm. The kill zone paddle is attached to the rear top of the paddle arm. The system work great but it does require a bit more attention when it is set up and it still won't fall flat. I have been working with a modified design that uses a small chain connected to the face and paddle arm to pull down the face on a hit. I have also weighted the target paddle so that when the paddle rotates back to the extent of the chain, the weight will pull the face down even with the face tilted forward 10 degrees. The face is also weighted a bit more forward so if the target is unlevel, it won't fall on its own or when it is blown by the wind. The design won't be perfect but it will make it easier to setup and work properly and help to reduce some of the target problems with spring loaded targets. I am going to retrofit some of more of my older gravity targets and some of my spring loaded targets and give the design some long term testing.
![]()